

This post may contain affiliate links. You can read my full affiliate disclosure here. Thank you for your support!
How to Make Paper Poinsettia Flowers – 2 Easy Options
Would you like to make gorgeous paper flowers to use for decorating or gift wrapping this Christmas? In this project tutorial, I’ll walk you step by step through how to make paper poinsettia flowers.
I’ve included both hand-cutting and machine-cutting templates and instructions, so you can use whatever tools you have available!
This post may contain affiliate links. This means if you purchase an item after clicking a link in this post, I may get a small commission. There is no cost to you and these small affiliate commissions help me provide the resources on this website for free. You can read my full affiliate disclosure here. Thank you for your support!
Pretty Paper Poinsettias for the Holidays
These pretty paper poinsettias are easy to make and display. You can whip them up on a Saturday afternoon and have them for years!
Why make paper flowers? Well, they’re pretty and economical. In fact, if you’re a paper crafter, you probably have most of the supplies you need tucked away in your craft nook.
You can make them in any color to match your decor. You can also make them in various sizes to use in other projects. Use big ones for a table centerpiece, or mini ones on top of special Christmas gifts.
There’s also lots of joy in making something so lovely from scratch. Nothing is quite as satisfying as starting with a pile of paper, beads, and wire, and ending up with a beautiful bouquet of poinsettias!
Unlike real flowers, you can pop them in a box after Christmas, and pull them out again next year!
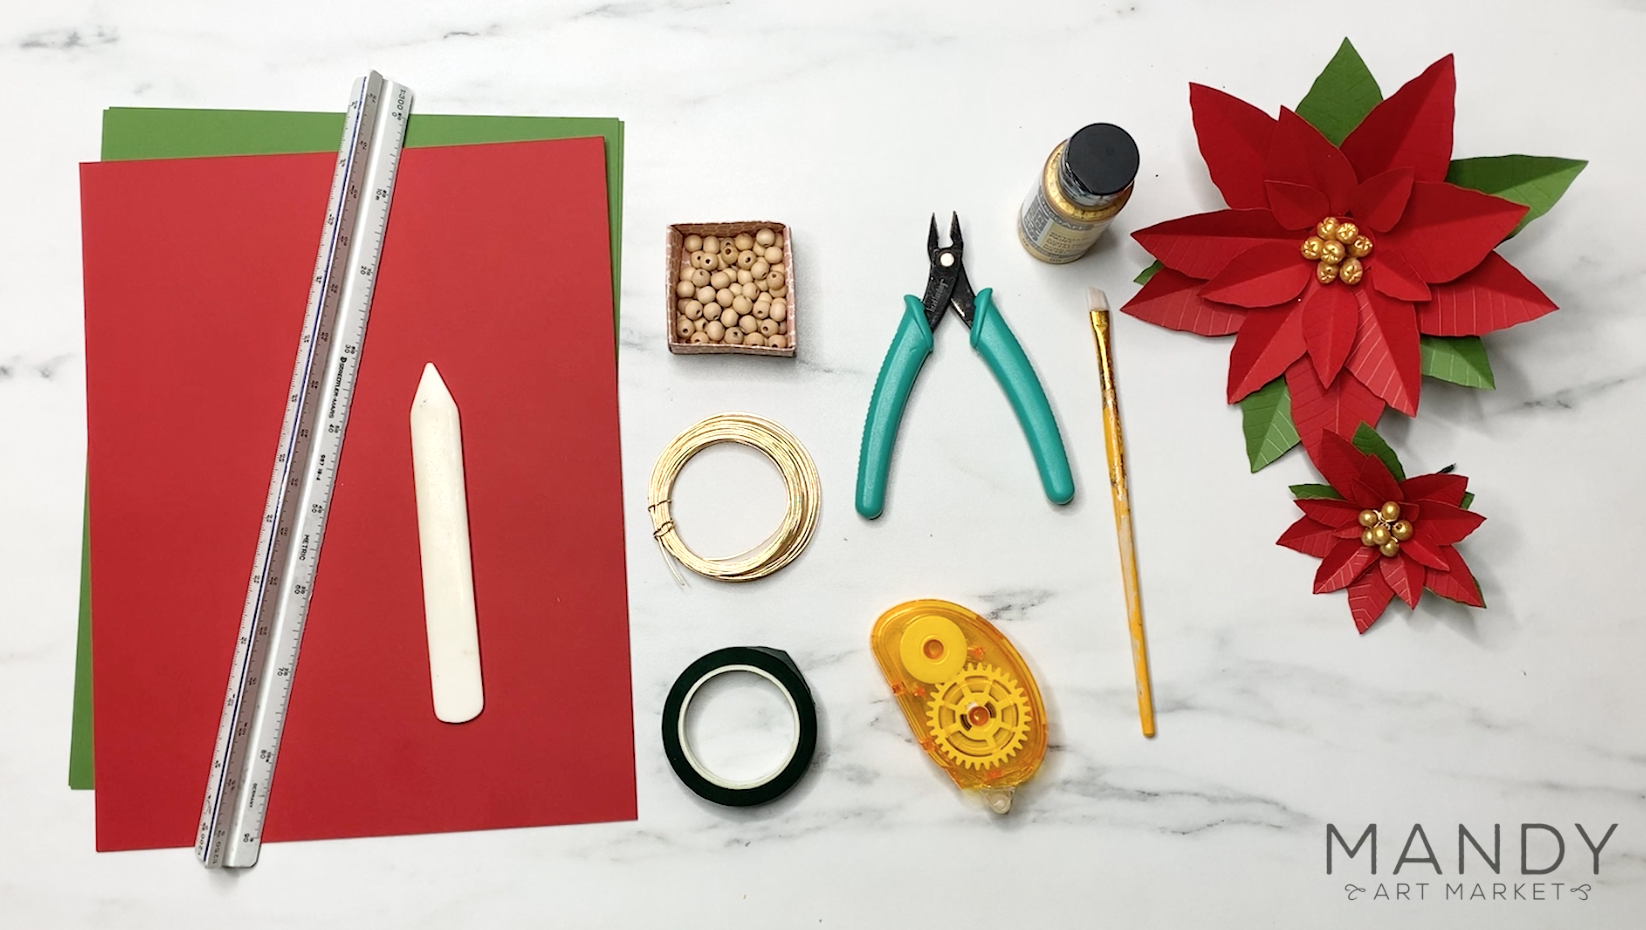
Supplies You’ll Need
The supplies you’ll need for this project are fairly inexpensive and easy to find. You may even have them in your craft stash right now!
Here are the supplies you’ll need to follow this how-to-make paper poinsettias tutorial.
Download the Free Poinsettia Templates Here!
Supplies for Both Hand & Machine Cutting
- Cardstock in colors for poinsettia petals and leaves
- If you’re not using beads, cardstock for flower centers
- Embossing tool or bone folder (can use a dry pen, paintbrush handle, etc)
- Double-sided runner tape or quick-drying craft glue
If You’re Using Beads to Make Paper Poinsettia Centers
- Beads for stamen
- Paint for stamen (optional)
- Paintbrush for stamen (optional)
- Wire for stamen
- Floral tape or washi tape
Supplies If You’re Hand Cutting
- Free hand-cutting templates
- Cutting mat
- Craft knife (or small scissors)
- Pencil
Supplies If You’re Machine Cutting
- Free machine-cutting templates
- Cutting machine (like Cricut or Silhouette)
- Cutting machine mat
- Sharp cutting blade
Step-by-Step Video Instructions for How to Make Paper Poinsettias
The YouTube video below will walk you through how to make paper poinsettias step by step, using the free template files.
Instructions are included for both machine cutting and hand cutting and using bead flower centers and paper flower centers.
Step-by-Step Photo Instructions for How to Make Paper Poinsettia Flowers
If videos are not your thing, you may want step-by-step written instructions. Don’t worry, I’ve got those covered too! Follow these and you’ll be on your way to beautiful, handmade poinsettias.
Would you like to make gorgeous paper poinsettias that you can use for gift-wrapping or decorating during the holidays?
Today I’m going to show you how to make these pretty paper poinsettias using free templates from my website.
You can make them in any color you like and I’ll show you how to do it with a cutting machine and without, and with beads in the middle and without. Let’s get started!
Step 1: Gather the Supplies
Whether you’re hand cutting or machine cutting you’ll need: cardstock for the flower petals and leaves, and if you don’t want to use beads cardstock for the center as well.
Beads for the centers of the flowers, six or seven beads per flower. Thin jewelry wire, pliers to clip the wire, paint, and a paintbrush are optional if you want to paint the beads in the middle.
A straight edge like a ruler. Something to score the cardstock with, like a bone folder. You’ll need floral tape or washi tape and glue tape or regular fast-drying glue to hold everything together.
If you’re hand cutting your flowers, you’ll also need a cutting mat, the hand cutting template files which can be downloaded for free from the link to my website in the description below, a pencil, and a craft knife. A small sharp pair of scissors might also be helpful.
If you’re going to be machine cutting your poinsettias you’ll need the machine cutting template files, which can be downloaded for free off my website at the link in the description below. A cutting machine like a Silhouette or a Cricut with a sharp blade and a cutting mat. If you don’t already have a cutting machine, I’ll put the links in the description below for both the Silhouette and the Cricut. Both of these machines are excellent they’re solid machines and if you do a lot of crafting they’re an awesome tool to have.
Step 2: Download the Files
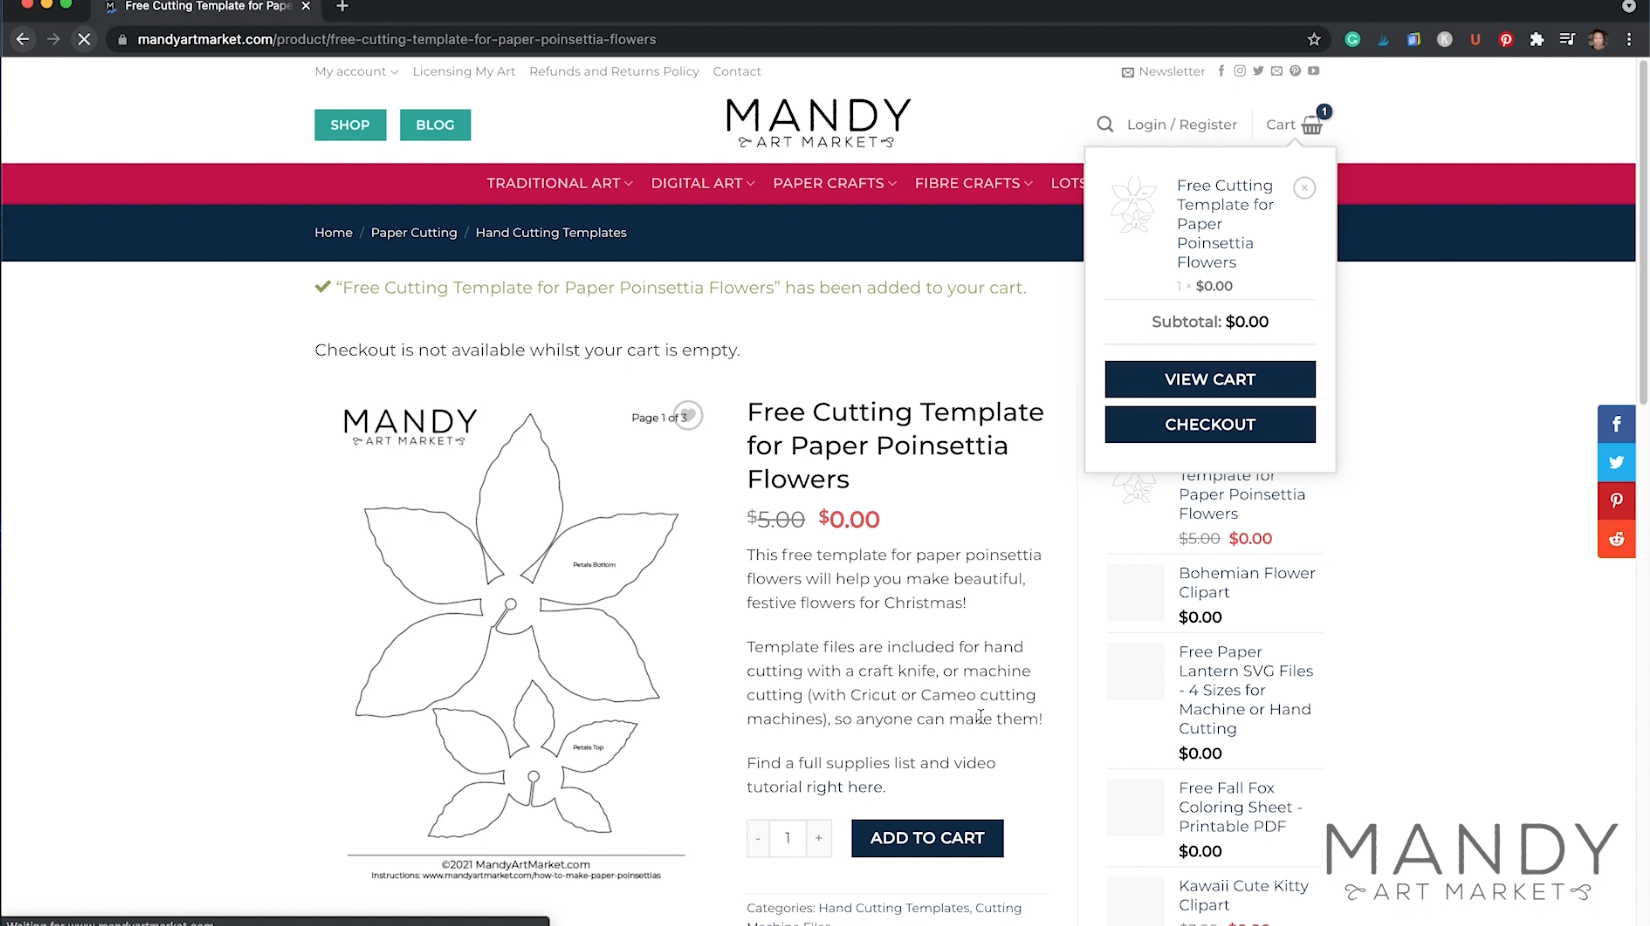
The first thing you need to do is download the template package. It has both the hand cutting files and the machine cutting files in it and it’s completely free. I’ll put the link in the description below so you can go over and grab it.
Once you’re on my site just hit add to cart and then go through the checkout process. You do have to put in an email address so it can send you the files, but you don’t need to have an account unless you want to create one. If you download lots of my freebies having an account might be useful because it keeps all your downloads in one place, but otherwise you can just check out as a guest.
Whether you create an account or not, you can also subscribe to my newsletter if you want to be notified every time I add new freebies and tutorials.
Once you’ve checked out you’ll be redirected to the download page where you can click the big teal-colored button and it will automatically start the download in your browser. Once you’ve downloaded it you can open the file either directly from your browser or from your downloads folder depending on how your computer is set up.
You’ll see inside there are three subfolders. One is “hand-cutting PDF files” which is obviously for hand cutting, and there are two different formats for machine cutting. The PNG format can be used for both Cricut and Silhouettes design software. I think the SVGs can be used in Cricut software, but only in the premium version of the Silhouette software, so you can use whatever format works best for you.
Step 3: Cut Out the Poinsettia Template Shapes


Cutting with by Hand
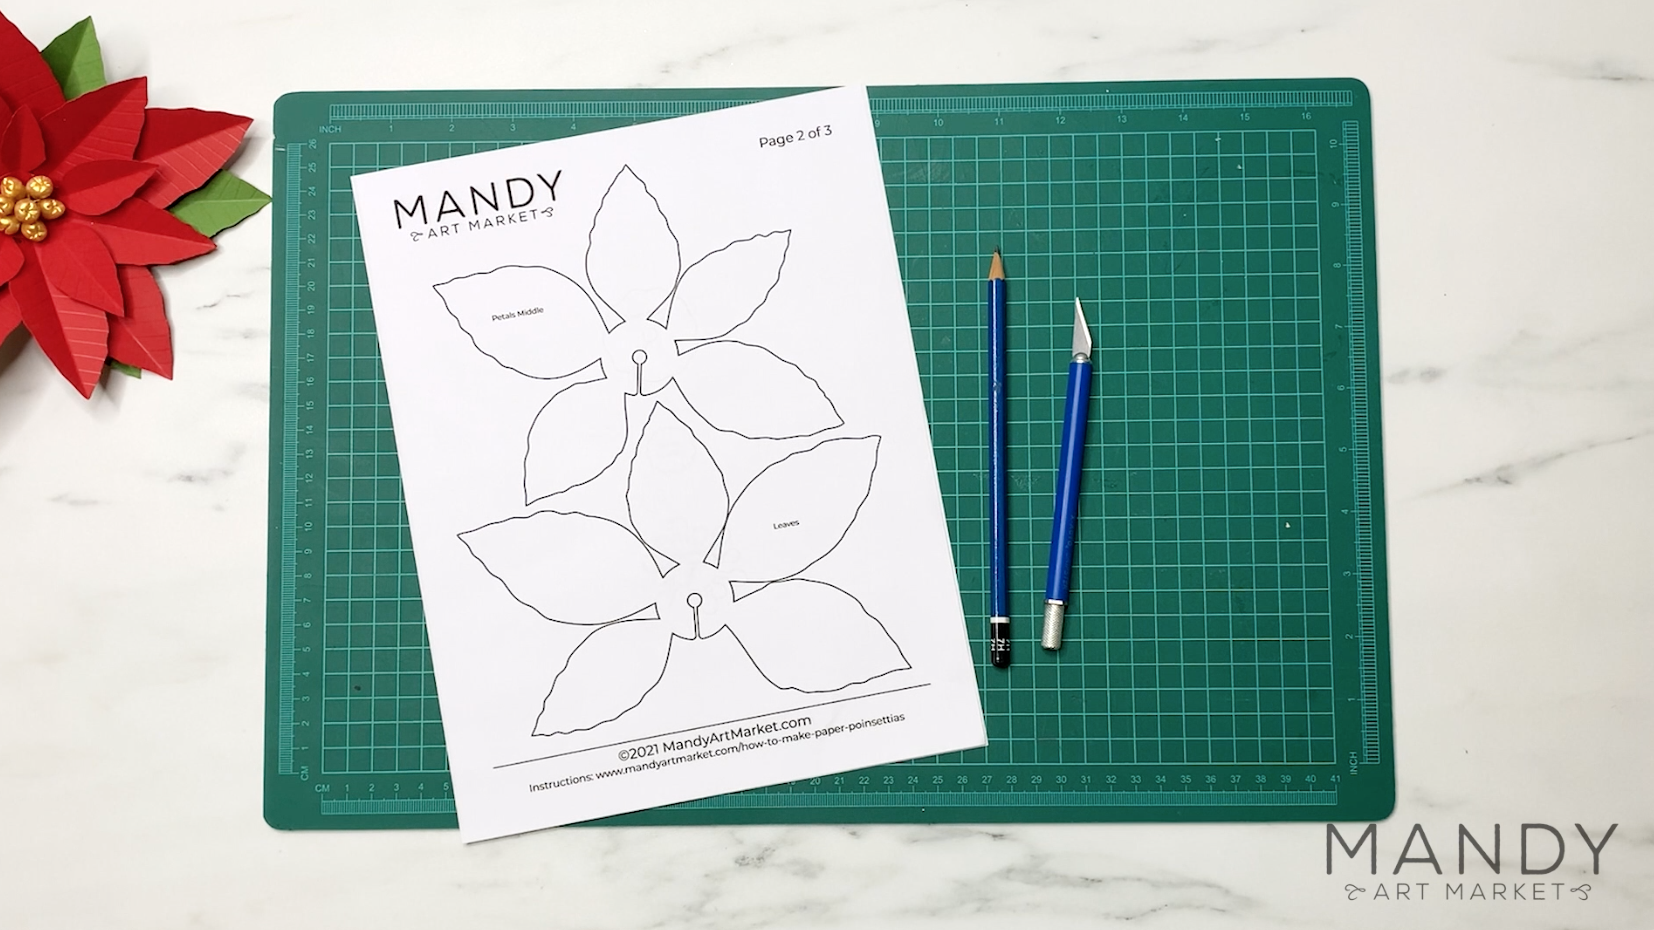
If you’re going to be cutting your flowers by hand, you’ll need to start out by printing off the three-page pdf template from the package you just downloaded. If you’re machine cutting, just skip ahead to the next section.
The PDF template file has three sheets. The first one has two layers of petals for your flowers, the second sheet has a layer of petals and a layer of leaves, and the third sheet has a stem cover and the two layers for the center of the flowers if you want to use them.
The process here is pretty straightforward you just need to start by cutting each shape out carefully with your craft knife.
If you don’t have a craft knife and cutting mat you can probably get away with a small pair of sharp scissors. Just be extra careful around the little tiny circles in the centers of the flowers. It took me a couple of minutes to cut this layer out so I’ll just speed up the video.
You don’t have to be 100% perfect about this. Just get it as close to the lines as you can without driving yourself crazy.
You can see that I just tear the paper away as I go, which makes it easier to get in there with a knife and see what I’ve already cut out.
This is that tricky little bit I was talking about in the middle. If you’re using scissors just be extra careful with this part.
Okay, so once the template piece is all cut out we’ll just put it on top of a piece of card stock from the craft store. This is 65-pound stock but you can use a heavier or lighter cardstock if you like.
I’m going to use a pencil to trace all the way around the template. This will give us clear lines on the cardstock to cut out our petals.
Again, let’s speed this part up.
There we go. Now we have pencil lines on the red cardstock. Now we’ll just use our craft knife to cut the final shape out.
You need to repeat this process for all of the pieces in the template. When you’re finished you should have three layers of petals, one layer of leaves, and one stem cover. The flower centerpieces are optional depending on whether or not you want to use beads for the center of your poinsettias.
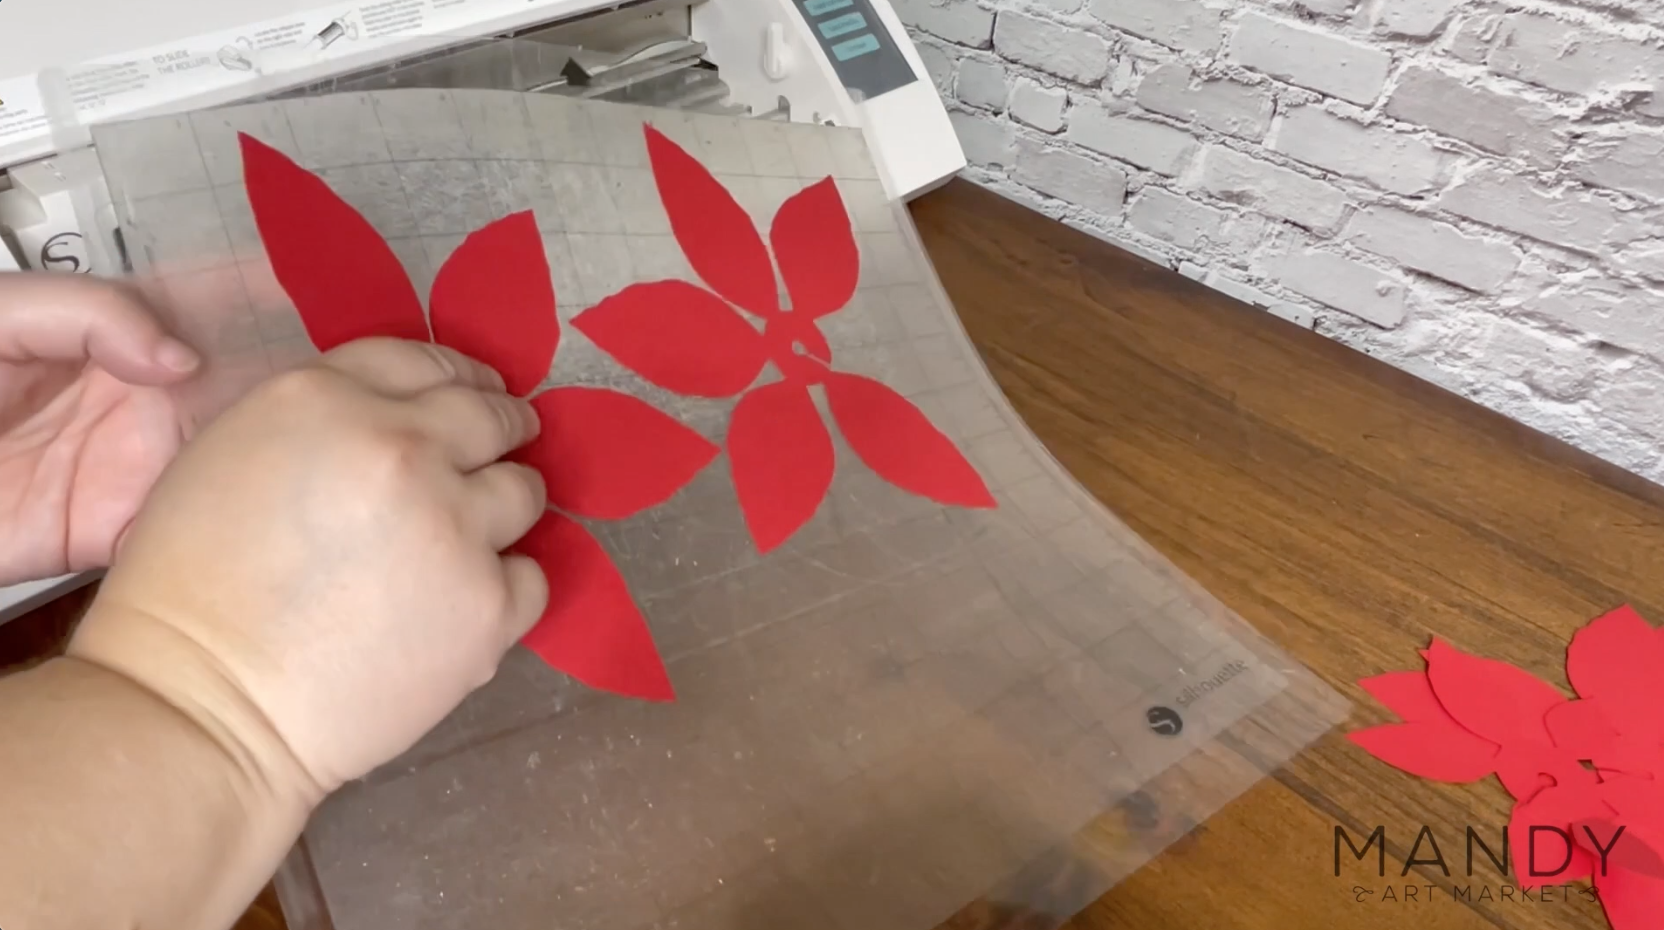
Cutting with a Machine
If you’re machine cutting you can use the PNG or SVG files and lay them out in your cutting software however works for the size of your paper.
I was able to fit two sets of petals onto two eight and a half by 11 sheets of cardstock and two sets of leaves and stem covers onto one sheet of green cardstock.
Place the cardstock onto your cutting mat and load it into the machine cutting these took 10 minutes or so so we’ll speed it up to save some time.
This is two sets of the top and middle layers of the petals for the flowers.
This sheet is two sets of the biggest bottom layer of petals.
And finally, two sets of leaves and two stem covers.
If you’re not using beads for the center of your flowers, you’ll want to cut out the centerpieces as well. I’m cutting out two sets of the center of the flowers because I made two sets of everything else.
Just be careful when you’re pulling these off the mat because they are a little bit delicate and you don’t want to rip them.
Now that we’ve got all the pieces cut out it’s time to make the stamen for the middle of the flowers. If you’re using the cardstock centers you can skip this step altogether and go on to embossing and assembling the flowers.
Step 4: Make the Poinsettia Stamen


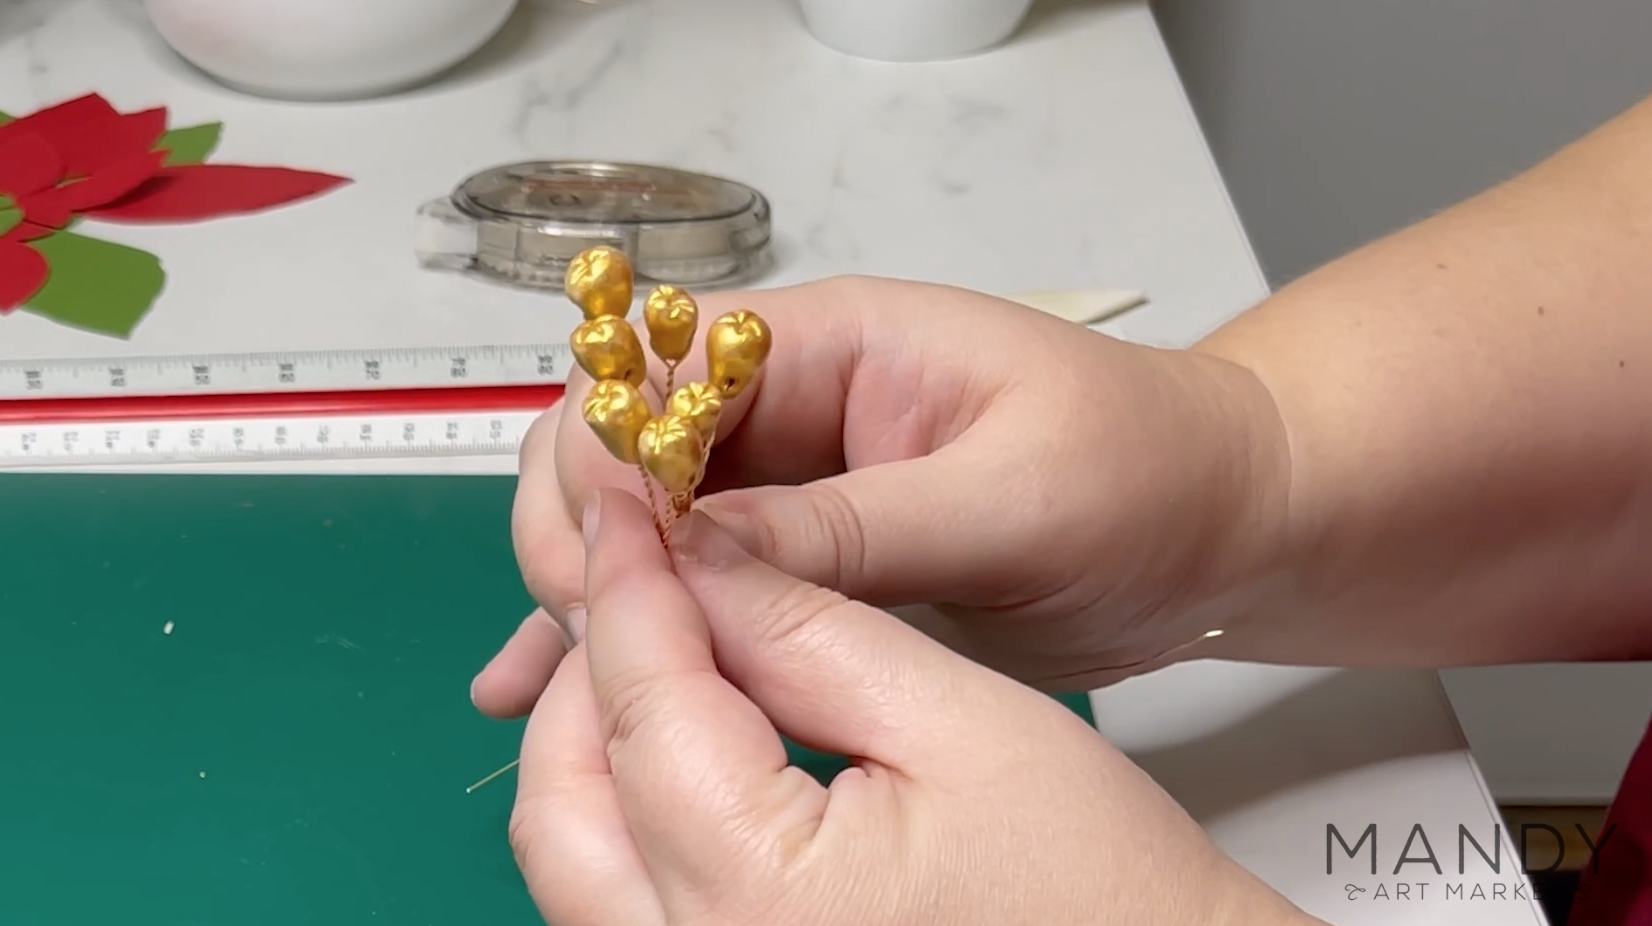
I made some beads that look sort of organic for the center of the flowers. They have little indents on the top and a hole toward the bottom to put the wire through. I made them with polymer clay like Fimo or Sculpey, and baked them in the oven to harden them up. But if you don’t want to go to all the trouble of making your own beads you can just use wooden ones or even plastic. Whatever you have on hand.
The plan here is to thread some of these beads onto thin jewelry wire and paint them gold. Then we’ll bunch them together to make the center of the poinsettias.
The wire I’m using is just the really cheap value stuff from the craft store. It’s a gauge 24 so it’s nice and thin, and you don’t have to worry too much about what it looks like because most of it won’t be seen anyway.
Clip off a piece that’s about eight inches long to thread the bead onto.
You can make your wire as long or as short as you need it depending on what you plan on doing with the flowers.
Thread the bead onto the wire and position it about a third of the way down.
Then fold the wire over and give it a twist to hold the beads in place. Keep cutting pieces of wire and twisting beads into place until you have enough to make the center bundle for the flower. For the size of beads I’m using, I found that six or seven of them was enough to make a perfect bundle for the inside of the flower.
I find it easier to hold the wire in my right hand with a pair of jewelry pliers, so if you have a pair it’s worth a try. Again this took a few minutes so we’ll speed it up.
Once I’ve got all the beads on the wire I’m going to paint mine with metallic gold paint. Obviously, you can use any color you want or, if you like the color of your beads, you don’t have to paint them at all.
This is deco art acrylic paint. It’s called Extreme Sheen 24 karat gold, but really any acrylic paint will do.
Just use an inexpensive craft paintbrush to paint these.
It took two layers of the gold paint to get full coverage on these beads, and it did take a few hours in between for each layer to dry.
I thought I was going to put the beads in the little white bowl to dry but it turns out they were too top-heavy and they would just fall over. So, what I did find worked well was using some masking tape to tape them to the edge of the heavy dish. That way they weren’t touching anything while they dried and it made a perfect gold finish.
Once the second coat was on, they looked really smooth and shiny. Perfect!
Step 5: Emboss the Petals & Leaves

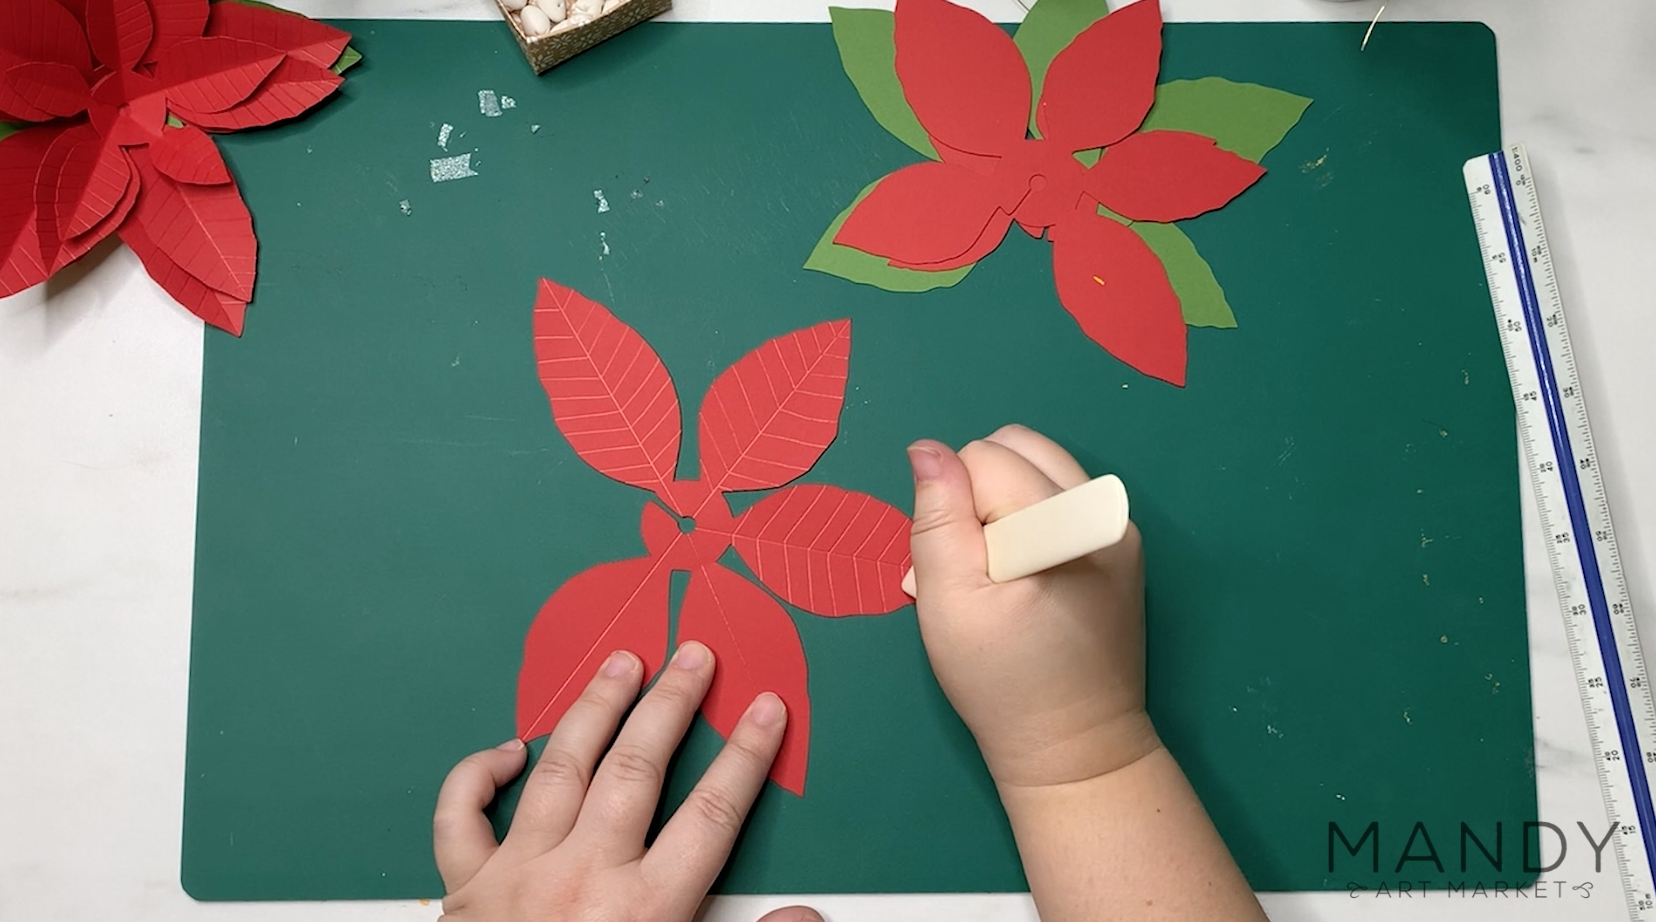
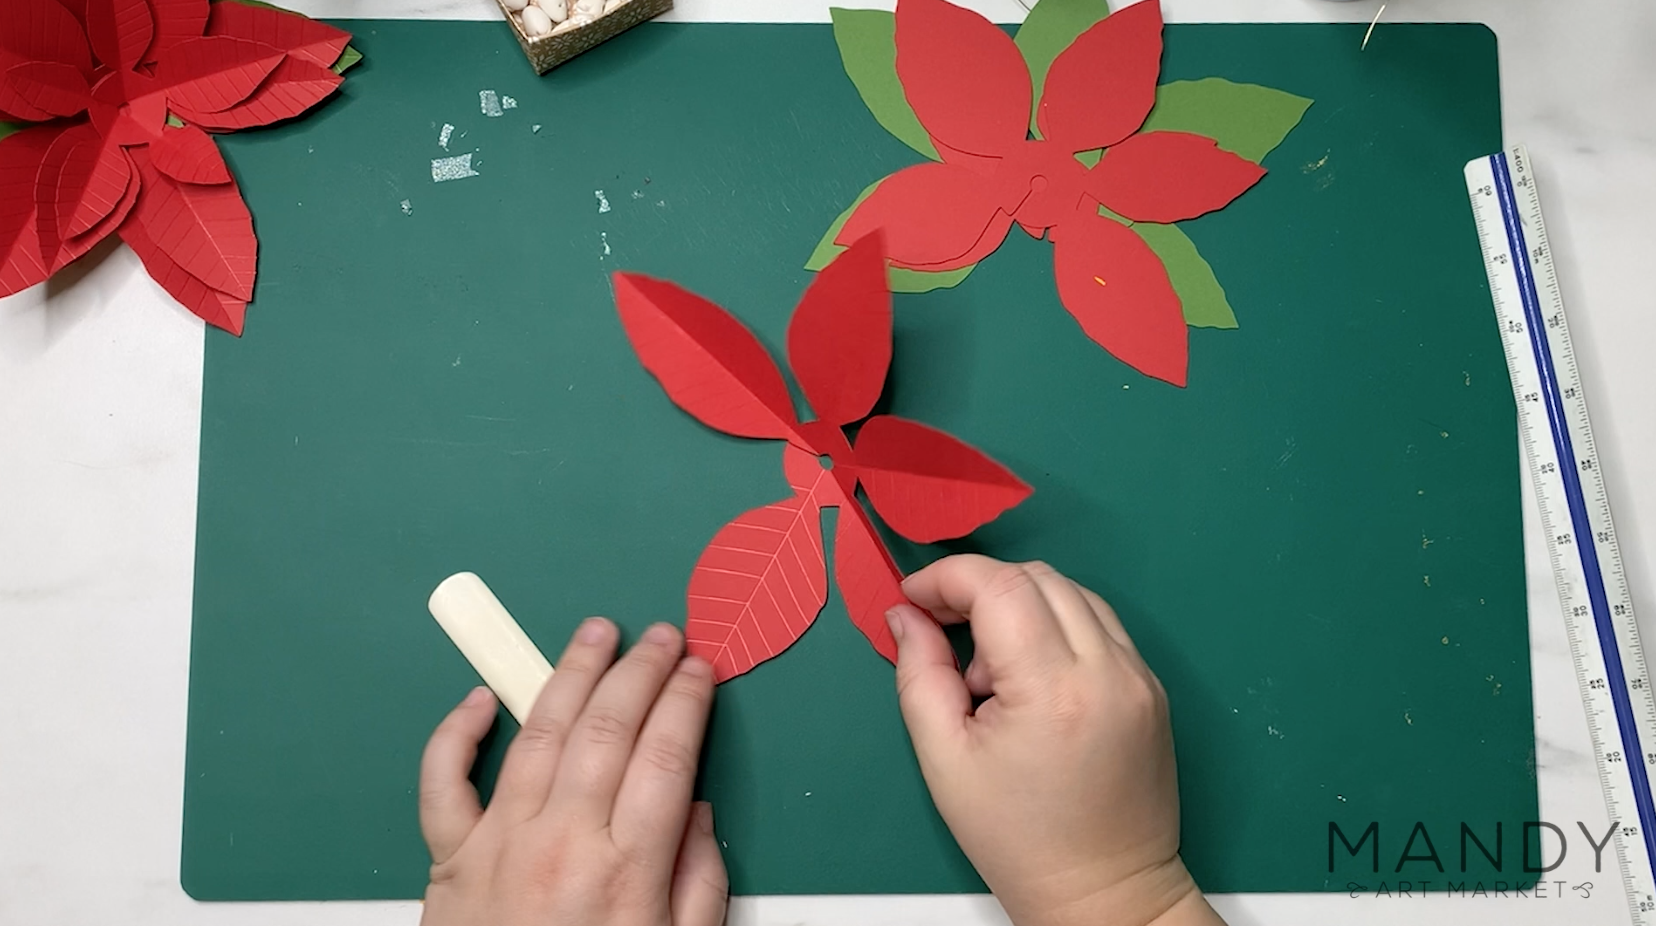
Now that all the pieces are cut out and the stamen is made, we’re going to emboss lines onto the petals and leaves of the flowers.
You don’t have to emboss the petals and leaves, but I think it adds dimension to the finished flowers.
Let’s grab a straight edge like a ruler and something to do the embossing with. I’m using the bone folder I use for paper folding but you can use something like a dead ballpoint pen or even a knitting needle. Just don’t use anything too sharp. We don’t want to cut the cardstock, we just want to press these little lines into it.
You want to make your line right down the middle of the petal from the very tip into the center cutout.
It helps to have something that has a little bit of give underneath the flower when you’re working on it. If you don’t have a cutting mat, you can use an old book or a stack of cardstock.
Once all the middle lines are done, you can start making little diagonal lines from the center out and angled toward the tip of the petals. I’m just free handing it, but if you feel more comfortable you could use a ruler here as well. Keep working your way around the petals until you’ve embossed the details on each one.
Once you’re done embossing all the petals, we’re going to fold the middles of them. This will make a crease down the center of the petal and add dimension to the finished flower.
Work your way around all five petals, making sure to press firmly so the crease will hold.
Step 6: Assembling the Poinsettia Flowers
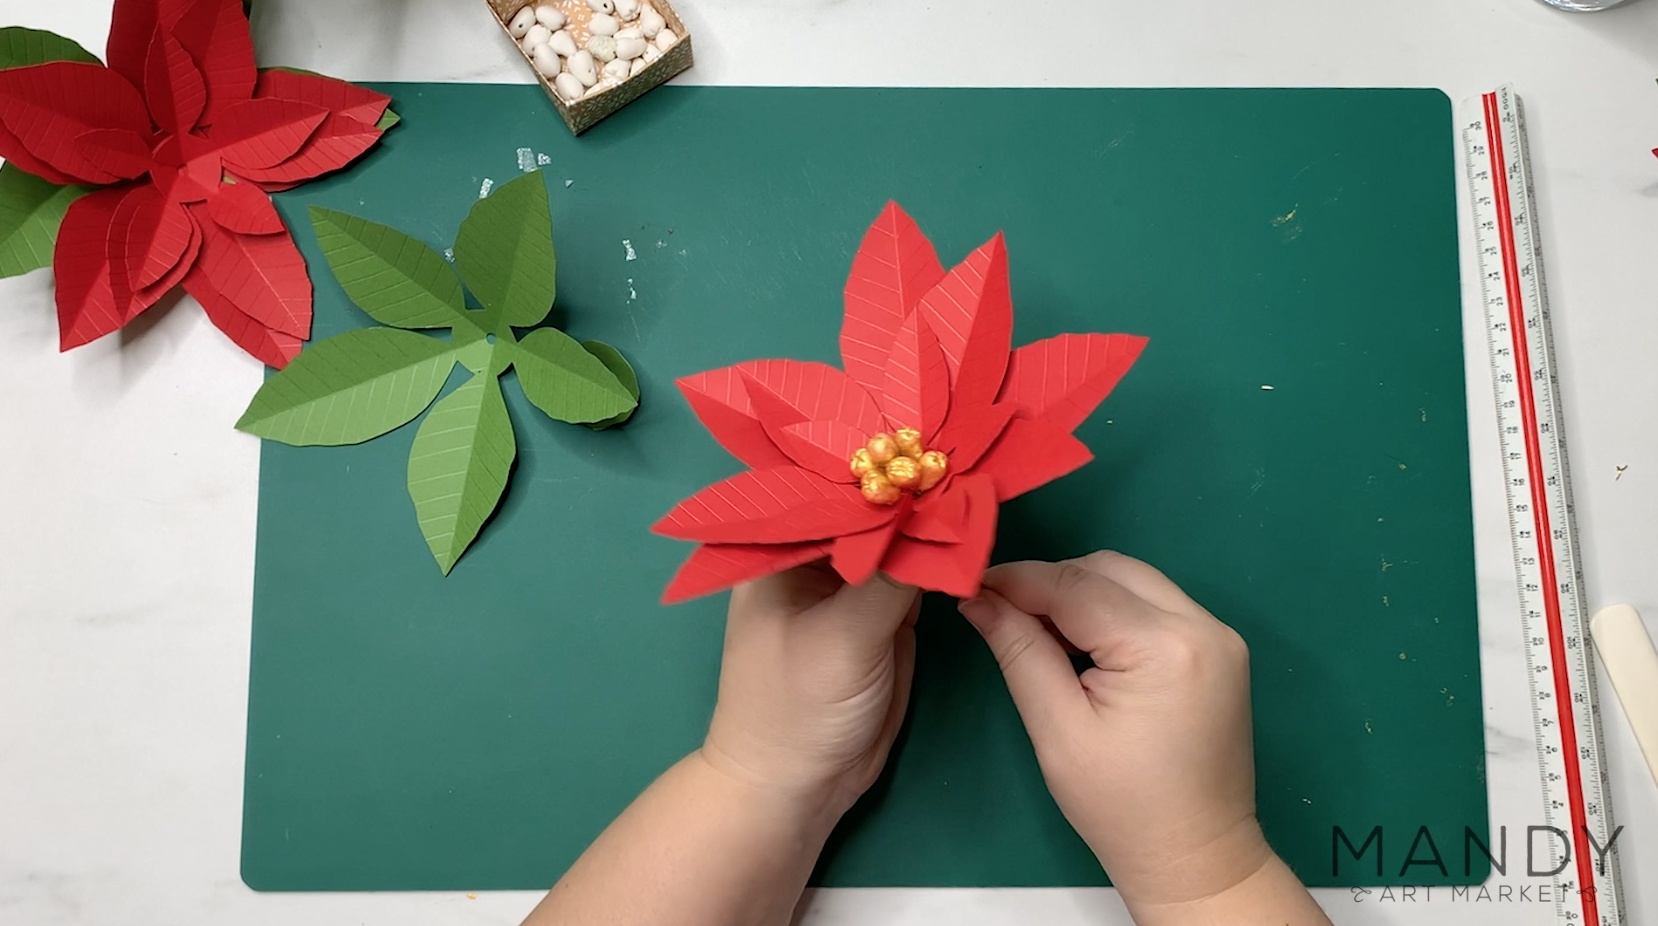
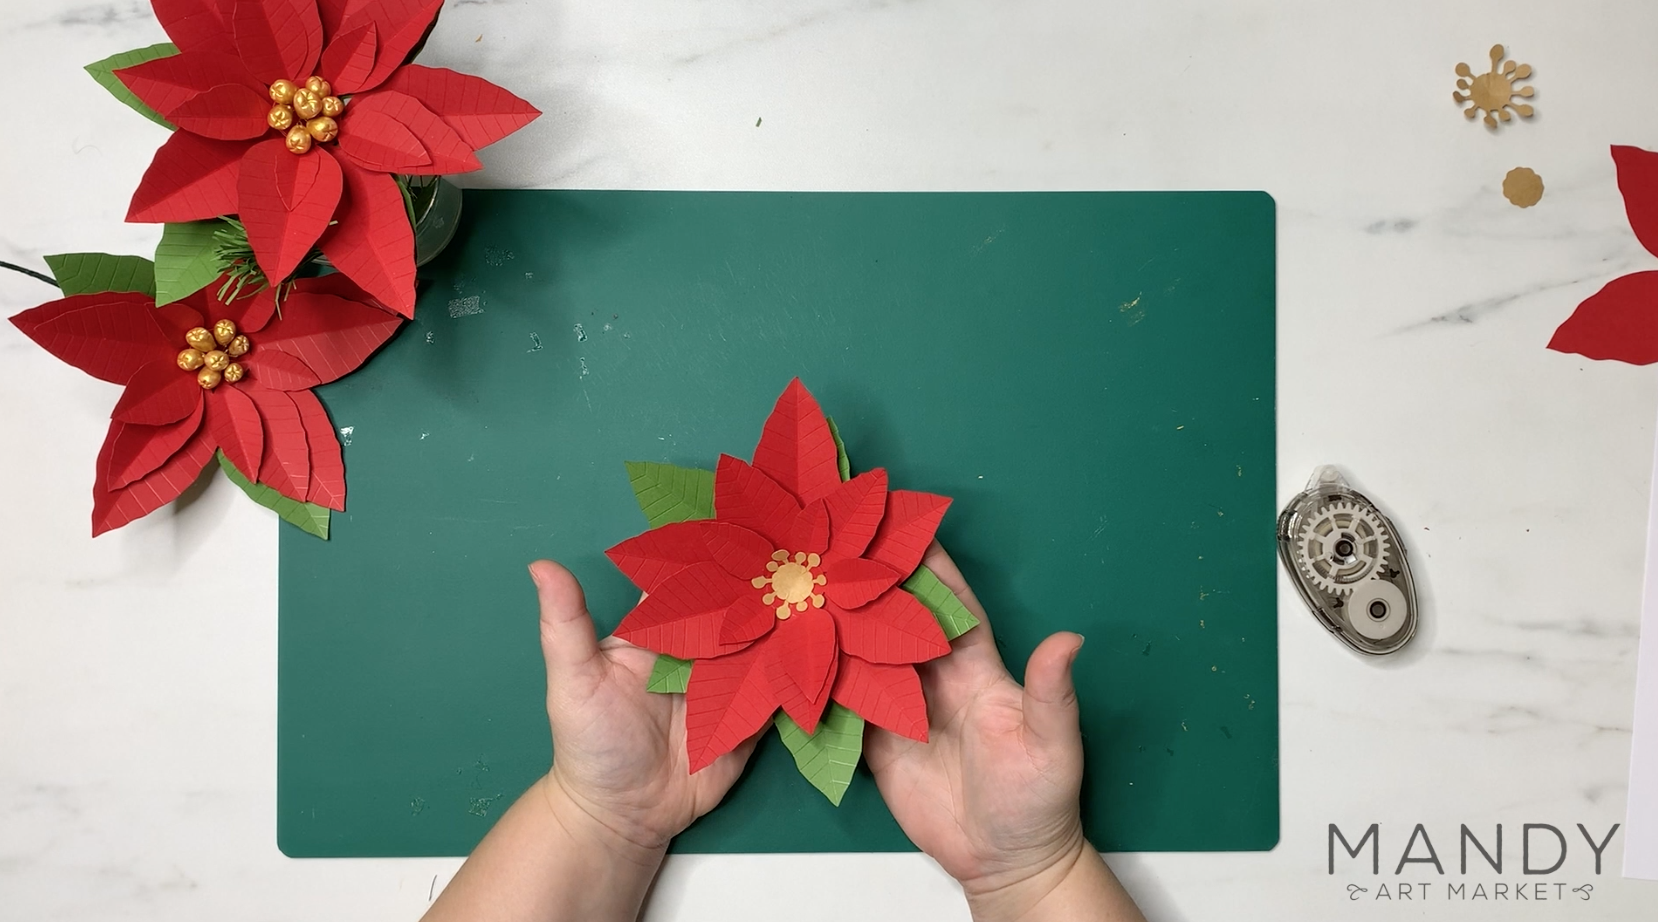
Now we’re going to use a tiny bit of double-sided tape if you have it, or glue if you don’t, to tape the center of the flower together. There’s a little tab on the center circle of the flower where we can apply a bit of double-sided tape. We’re going to use it to overlap the other side of the flower to form a sort of funnel shape.
Press the taped sides together really firmly to make sure they hold. Repeat this process for each of the different layers of the flower. Altogether you’ll have three layers of petals and one layer of leaves.
All that’s left to do now is to tape the stem cover together. We don’t need to emboss anything on the stem cover, just apply a little bit of tape and overlap the two edges so that you make a small funnel shape.
The stem cover is just to go on the back of the flower to make where the stem connects with the leaves look a little neater.
If you’re not using beads for your flowers you can assemble the little centerpiece as well. If you’re using beads you don’t need this part.
Now that we have all the pieces ready to go, we just need to assemble the flower. I’m going to show you how to do it with the beads first and then I’ll show you the version without the beads.
We’re going to straighten up the wires on the beads and gather them into a little bundle. Again, I found six or seven beads fit perfectly in the center of the poinsettia.
Once you’ve got them bundled up, just give the wires a few twists to hold them all together. Keep twisting the wire all the way down so there are no loose ends poking out. The wires that we’re twisting together here are going to form the main stem of the flower.
Now we’ll just start stacking our petals onto the stem. We’ll start with the smallest petals and work our way up, with the last ones being the leaves.
If you want to add a little bit of double-sided tape or glue in between the layers you can do that – It’ll help them stay together. But it’s not absolutely necessary as the stem will do most of the holding.
The last part to add is the little stem cover to make the back of the leaves look a bit more finished. Twist the petal and leaf layers into place to make sure they can all be seen.
Now we’ll wrap the wire with tape to make the wire look like a stem. I’m using floral tape but you can also use a lightweight masking tape like washi tape.
Starting at the top, wrap it as tightly as you can around the wire. This is going to help hold all of the leaves and petals in place. Work your way down the wire, wrapping tightly as you go, to hold all of the wire together.
Once you get to the end of the stem add some double-sided tape or glue to hold that tail in place. That’ll keep it from coming unwound from the stem.
There! All done! I think the paper poinsettias look great with the gold beads in the middle, but if you want to make them with a paper center, I’ll show you how to do that next.
This is super simple. We’re just going to add a bit of double-sided tape or glue if that’s what you’re using to the center circle of each layer. Then we’ll stack the next layer and press it firmly to make sure everything holds together.
Try not to get any adhesive outside of the circle in the center of the flower, because if it’s on the petals and leaves it’ll show on your finished flower.
Once the petals and flowers are aligned the way you like them, give them a really firm press to make sure they stick. Keep sticking the layers together all the way up to the paper centers of the flower.
The centerpiece with the little things sticking out of it goes first, and then the circle goes on top just to finish it off.
There’s really no need to add the stem cover to this version because, well, there’s no stem to cover and you’ll probably be sticking them on something, so no one will see the back anyway.
How to Make Paper Poinsettias – All Done!
So that’s it! They’re all done! You can make them in all kinds of different color combinations, with different centers and different petals, and different leaves. I did some in red some in pink and some in blue and they all turned out nice.
Whatever combination you use I think you’ll find this a fun papercraft for the holiday season. Thank you so much for watching don’t forget to check out my papercraft playlist for more fun papercraft ideas.
Post & Share How to Make Paper Poinsettias!


